使用注解开发…
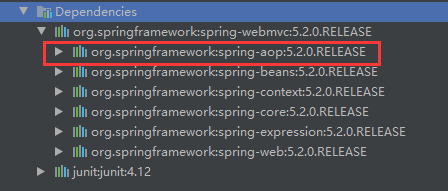
在Spring4之后,使用注解开发,必须要保证aop的包导入了

使用注解需要导入context约束,增加注解的支持!
1
2
3
4
5
6
7
8
9
10
11
12
| <?xml version="1.0" encoding="UTF-8"?>
<beans xmlns="http://www.springframework.org/schema/beans"
xmlns:xsi="http://www.w3.org/2001/XMLSchema-instance"
xmlns:context="http://www.springframework.org/schema/context"
xsi:schemaLocation="http://www.springframework.org/schema/beans
https://www.springframework.org/schema/beans/spring-beans.xsd
http://www.springframework.org/schema/context
https://www.springframework.org/schema/context/spring-context.xsd">
<context:annotation-config/>
</beans>
|
1.bean
2.属性如何注入
1
2
3
4
5
6
7
8
9
10
| @Component
public class User {
public String name;
@Value("marlowe2")
public void setName(String name) {
this.name = name;
}
}
|
3.衍生的注解
@Component有几个衍生注解,我们再web开发中,会按照mvc三层架构分层!
- dao【@Repository】
- service【@Service】
- controller【@Service】
这四个注解的功能都是一样的,都是代表将某个类注册到Spring中,装配Bean
4.自动装配
1
2
3
4
| - @Autowired:自动装配通过类型。名字
如果Autowired不能唯一自动装配上属性,则需要通过@Qualifier(value="xxx")
- @Nullable: 字段标记了这个注解,说明这个字段可以为null
- @Resource: 自动装配通过名字。类型
|
5.作用域
1
2
3
4
5
6
7
8
9
10
11
| @Component
@Scope("prototype")
public class User {
public String name;
@Value("marlowe2")
public void setName(String name) {
this.name = name;
}
}
|
6.小结
xml与注解:
- xml: 更加万能,适用于任何场合!维护简单方便
- 注解: 不是自己的类使用不了,维护相对复杂!
xml与注解最佳实践:
- xml用来管理bean
- 注解只负责完成属性的注入
- 我们在使用的过程中,只需要注意一个问题:必须让注解生效,就需要开启注解的支持
1
2
3
| <!--指定要扫描的包,这个包下面的注解就会生效-->
<context:component-scan base-package="com.marlowe"/>
<context:annotation-config/>
|


