


依赖注入
简述依赖注入的三种方式
构造器注入
见文章《IOC创建对象的方式》
Set方式注入【重点】
- 依赖注入:Set注入!
- 依赖:bean对象的创建依赖于容器!
- 注入:bean对象中的所有属性,由容器来注入!
【环境搭建】
- 复杂类型
1
2
3
4
5
6
7
8
9
10
11
12
public class Address {
private String address;
public String getAddress() {
return address;
}
public void setAddress(String address) {
this.address = address;
}
} - 真实测试对象
1 | public class Student { |
- beans.xml
1 |
|
- 测试类
1 | public class MyTest { |
- 完善注入信息
1
2
3
4
5
6
7
8
9
10
11
12
13
14
15
16
17
18
19
20
21
22
23
24
25
26
27
28
29
30
31
32
33
34
35
36
37
38
39
40
41
42
43
44
45
46
47
48
49
50
51
52
53
54
55
56
57
58
59
60
61
62
63
64
65
66
67
68
69
70
<beans xmlns="http://www.springframework.org/schema/beans"
xmlns:xsi="http://www.w3.org/2001/XMLSchema-instance"
xsi:schemaLocation="http://www.springframework.org/schema/beans
https://www.springframework.org/schema/beans/spring-beans.xsd">
<bean id="address" class="com.marlowe.pojo.Address">
<property name="address" value="China"/>
</bean>
<bean id="student" class="com.marlowe.pojo.Student">
<!--第一种,普通值注入,value-->
<property name="name" value="marlowe"/>
<!--第二种,Bean注入,ref-->
<property name="address" ref="address"/>
<!--数组-->
<property name="books">
<array>
<value>红楼梦</value>
<value>西游记</value>
<value>三国演义</value>
</array>
</property>
<!--List-->
<property name="hobbies">
<list>
<value>篮球</value>
<value>乒乓球</value>
<value>足球</value>
</list>
</property>
<!--map-->
<property name="card">
<map>
<entry key="身份证" value="11111111"/>
<entry key="银行卡" value="22222222"/>
</map>
</property>
<!--Set-->
<property name="games">
<set>
<value>LoL</value>
<value>DNF</value>
</set>
</property>
<!--null-->
<property name="wife">
<null/>
</property>
<!--Properties-->
<property name="info">
<props>
<prop key="driver">11111</prop>
<prop key="url">marlowe</prop>
<prop key="username">root</prop>
<prop key="password">123456</prop>
</props>
</property>
</bean>
</beans>
扩展方式注入
我们可以使用p命名空间和c命名空间进行注入
官方解释: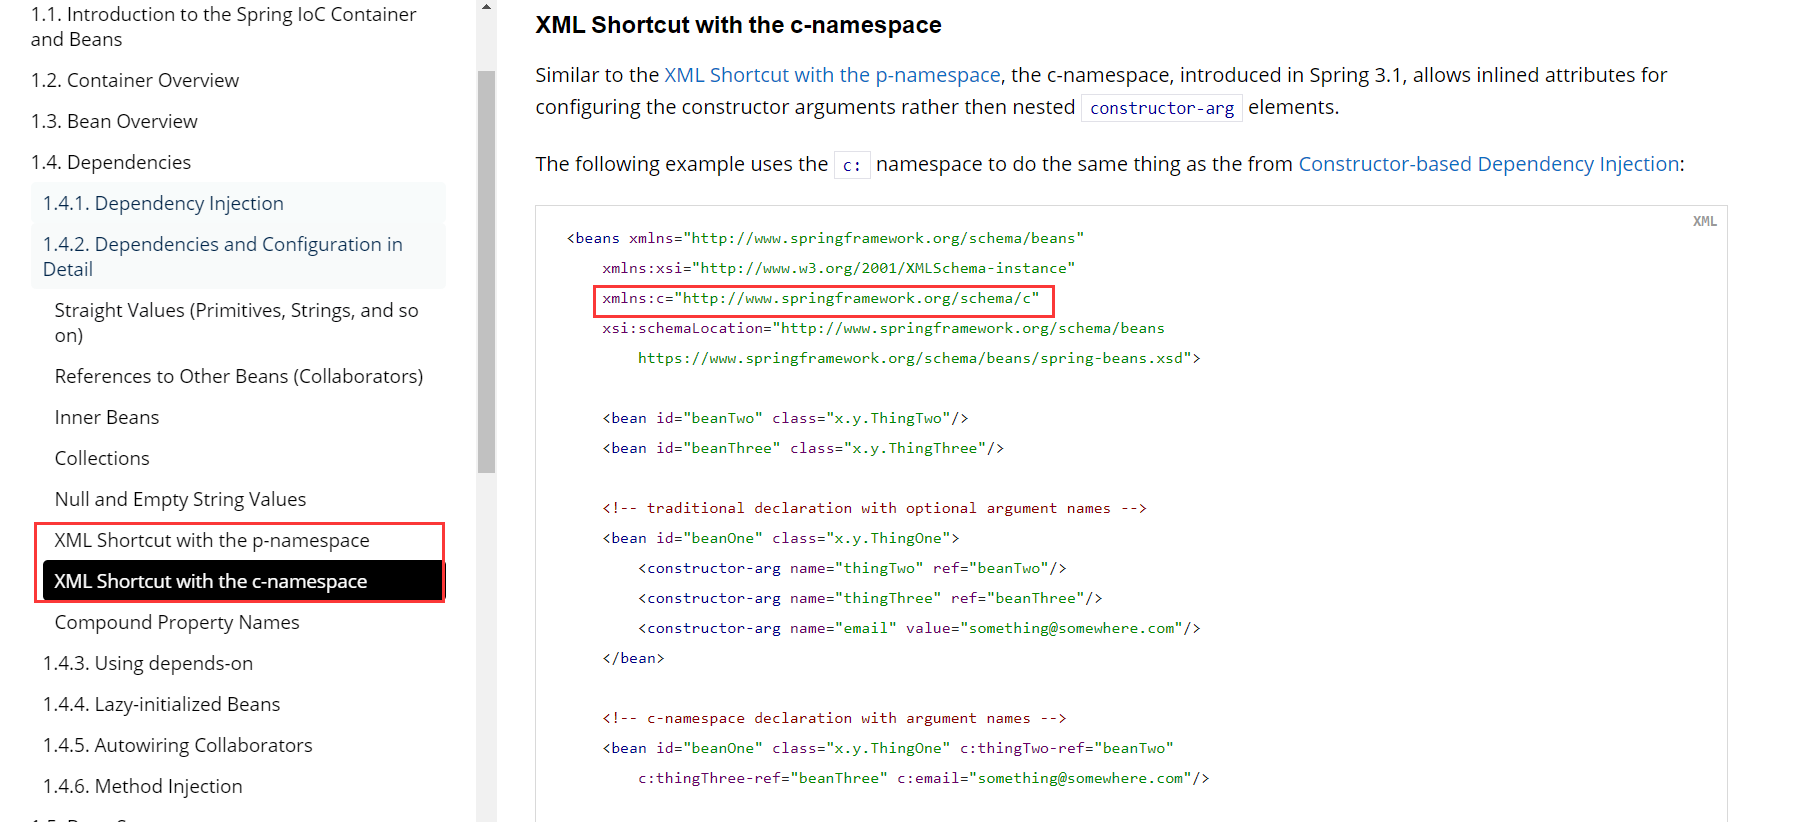
使用:
1 |
|
测试:
1 |
|
注意点:p命名和c命名不能直接使用,需要导入xml约束!
1 | xmlns:p="http://www.springframework.org/schema/p" |
bean的作用域
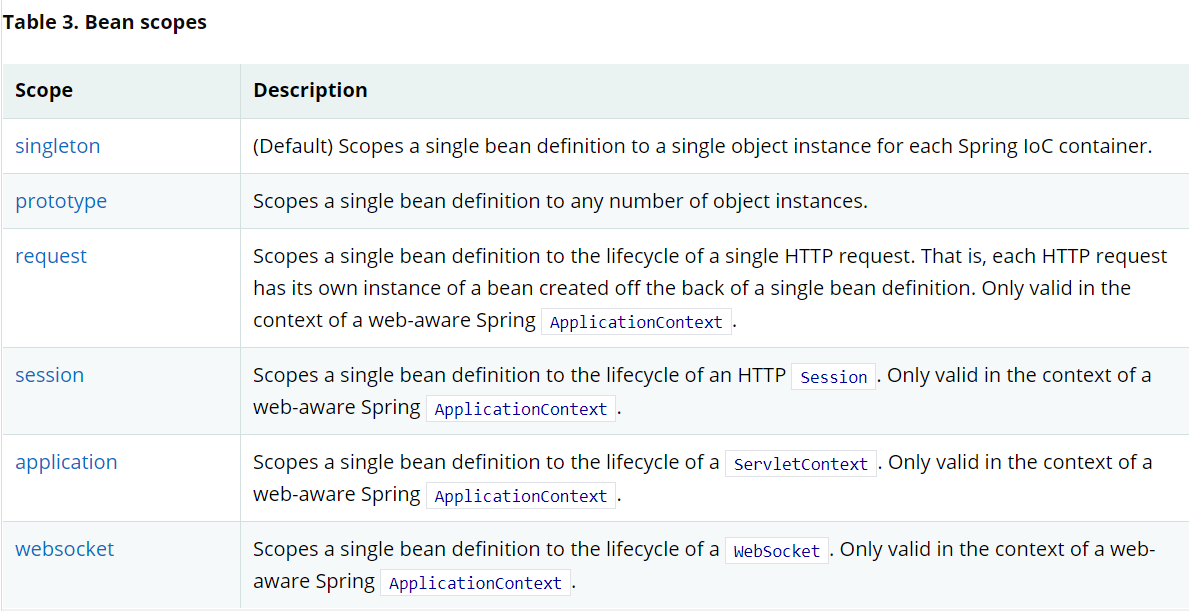
- 单例模式(spring默认机制)
1
<bean id="user2" class="com.marlowe.pojo.User" c:name="marlowe" c:age="18" scope="singleton"></bean>
- 原型模式:每次从容器中get的时候,都会产生一个新对象!
1
<bean id="user2" class="com.marlowe.pojo.User" c:name="marlowe" c:age="18" scope="singleton"></bean>
- 其余的request、session、application 这些只能在web开发中使用到!