AOP联盟标准

20210516170726

AOP联盟将AOP体系分为三层,从三层结构可以看出,AOP实现方式有很多种,包括反射、元数据处理、程序处理、拦截器处理等,通过本节学习,你就会看到Spring AOP的实现使用的是Java语言本身的特性,即Java Proxy代理类、拦截器技术实现。

AOP简介

概念

切面(Aspect): 官方的抽象定义为“一个关注点的模块化,这个关注点可能会横切多个对象”。
连接点(Joinpoint): 程序执行过程中的某一行为。
通知(Advice): “切面”对于某个“连接点”所产生的动作。
切入点(Pointcut): 匹配连接点的断言,在AOP中通知和一个切入点表达式关联。
目标对象(Target Object): 被一个或者多个切面所通知的对象。

AOP代理(AOP Proxy) 在Spring AOP中有两种代理方式,JDK动态代理CGLIB代理

通知(Advice)类型

前置通知(Before advice): 在某连接点(JoinPoint)之前执行的通知,但这个通知不能阻止连接点前的执行。ApplicationContext中在<aop:aspect>里面使用aop:before元素进行声明。
后通知(After advice): 当某连接点退出的时候执行的通知(不论是正常返回还是异常退出)。ApplicationContext中在<aop:aspect>里面使用<aop:after>元素进行声明。
返回后通知(After return advice): 在某连接点正常完成后执行的通知,不包括抛出异常的情况。ApplicationContext中在<aop:aspect>里面使用<after-returning>元素进行声明。
环绕通知(Around advice): 包围一个连接点的通知,类似Web中Servlet规范中的Filter的doFilter方法。可以在方法的调用前后完成自定义的行为,也可以选择不执行。ApplicationContext中在<aop:aspect>里面使用<aop:around>元素进行声明。
抛出异常后通知(After throwing advice): 在方法抛出异常退出时执行的通知。 ApplicationContext中在aop:aspect里面使用aop:after-throwing元素进行声明。

1
切入点表达式 :如execution(* com.spring.service.*.*(..))

特点

1、降低模块之间的耦合度

2、使系统容易扩展

3、更好的代码复用。

时序图

20210516171447

流程说明

1)AOP标签的定义解析刘彻骨肯定是从NamespaceHandlerSupport的实现类开始解析的,这个实现类就是AopNamespaceHandler。至于为什么会是从NamespaceHandlerSupport的实现类开始解析的,这个的话我想读者可以去在回去看看Spring自定义标签的解析流程,里面说的比较详细。

2)要启用AOP,我们一般会在Spring里面配置aop:aspectj-autoproxy/ ,所以在配置文件中在遇到aspectj-autoproxy标签的时候我们会采用AspectJAutoProxyBeanDefinitionParser解析器

3)进入AspectJAutoProxyBeanDefinitionParser解析器后,调用AspectJAutoProxyBeanDefinitionParser已覆盖BeanDefinitionParser的parser方法,然后parser方法把请求转交给了AopNamespaceUtils的registerAspectJAnnotationAutoProxyCreatorIfNecessary去处理

4)进入AopNamespaceUtils的registerAspectJAnnotationAutoProxyCreatorIfNecessary方法后,先调用AopConfigUtils的registerAspectJAnnotationAutoProxyCreatorIfNecessary方法,里面在转发调用给registerOrEscalateApcAsRequired,注册或者升级AnnotationAwareAspectJAutoProxyCreator类。对于AOP的实现,基本是靠AnnotationAwareAspectJAutoProxyCreator去完成的,它可以根据@point注解定义的切点来代理相匹配的bean。

5)AopConfigUtils的registerAspectJAnnotationAutoProxyCreatorIfNecessary方法处理完成之后,接下来会调用useClassProxyingIfNecessary() 处理proxy-target-class以及expose-proxy属性。如果将proxy-target-class设置为true的话,那么会强制使用CGLIB代理,否则使用jdk动态代理,expose-proxy属性是为了解决有时候目标对象内部的自我调用无法实现切面增强。

6)最后的调用registerComponentIfNecessary 方法,注册组建并且通知便于监听器做进一步处理。

创建AOP代理

上面说到AOP的核心逻辑是在AnnotationAwareAspectJAutoProxyCreator类里面实现,那么我们先来看看这个类的层次关系

20210516171546

这个类实现了BeanPostProcessor接口,那就意味着这个类在spring加载实例化前会调用postProcessAfterInitialization方法,对于AOP的逻辑也是由此开始的。

时序图

20210516171655

流程说明

1)spring 容器启动,每个bean的实例化之前都会先经过AbstractAutoProxyCreator类的postProcessAfterInitialization()这个方法,然后接下来是调用wrapIfNecessary方法。

1
2
3
4
5
6
7
8
9
10
11
12
13
14
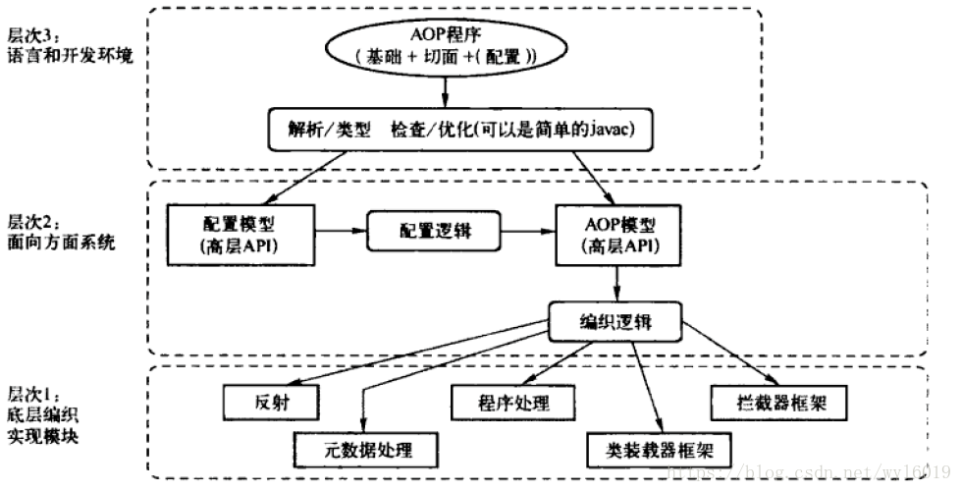
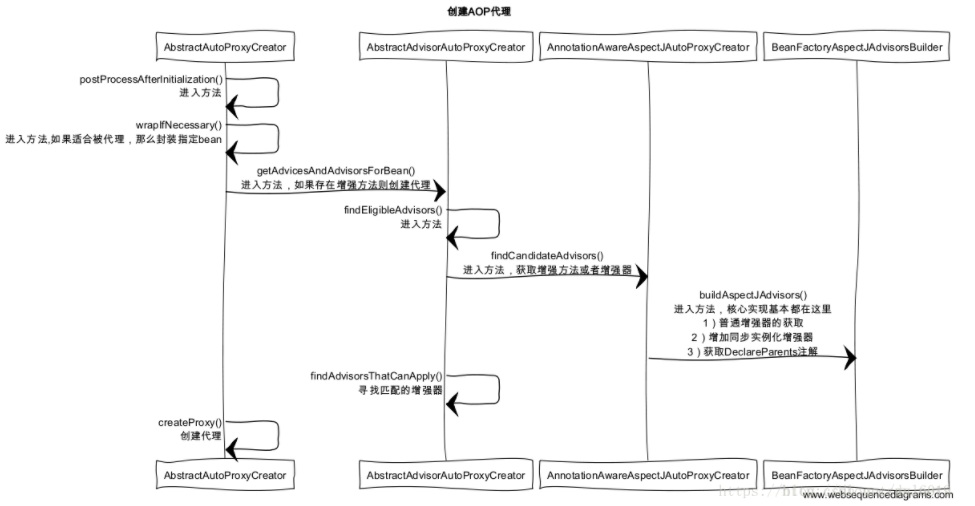
/** 
* Create a proxy with the configured interceptors if the bean is
* identified as one to proxy by the subclass.
* @see #getAdvicesAndAdvisorsForBean
*/
public Object postProcessAfterInitialization(Object bean, String beanName) throws BeansException {
if (bean != null) {
Object cacheKey = getCacheKey(bean.getClass(), beanName);
if (!this.earlyProxyReferences.containsKey(cacheKey)) {
return wrapIfNecessary(bean, beanName, cacheKey);
}
}
return bean;
}

2)进入wrapIfNecessary方法后,我们直接看重点实现逻辑的方法getAdvicesAndAdvisorsForBean,这个方法会提取当前bean 的所有增强方法,然后获取到适合的当前bean 的增强方法,然后对增强方法进行排序,最后返回

1
2
3
4
5
6
7
8
9
10
11
12
13
14
15
16
17
18
19
20
21
22
23
24
25
26
27
28
29
30
31
/** 
* Wrap the given bean if necessary, i.e. if it is eligible for being proxied.
* @param bean the raw bean instance
* @param beanName the name of the bean
* @param cacheKey the cache key for metadata access
* @return a proxy wrapping the bean, or the raw bean instance as-is
*/
protected Object wrapIfNecessary(Object bean, String beanName, Object cacheKey) {
if (beanName != null && this.targetSourcedBeans.containsKey(beanName)) {
return bean;
}
if (Boolean.FALSE.equals(this.advisedBeans.get(cacheKey))) {
return bean;
}
if (isInfrastructureClass(bean.getClass()) || shouldSkip(bean.getClass(), beanName)) {
this.advisedBeans.put(cacheKey, Boolean.FALSE);
return bean;
}

// Create proxy if we have advice.
Object[] specificInterceptors = getAdvicesAndAdvisorsForBean(bean.getClass(), beanName, null);
if (specificInterceptors != DO_NOT_PROXY) {
this.advisedBeans.put(cacheKey, Boolean.TRUE);
Object proxy = createProxy(bean.getClass(), beanName, specificInterceptors, new SingletonTargetSource(bean));
this.proxyTypes.put(cacheKey, proxy.getClass());
return proxy;
}

this.advisedBeans.put(cacheKey, Boolean.FALSE);
return bean;
}

3)获取到当前bean的增强方法后,便调用createProxy方法,创建代理。先创建代理工厂proxyFactory,然后获取当前bean 的增强器advisors,把当前获取到的增强器添加到代理工厂proxyFactory,然后设置当前的代理工的代理目标对象为当前bean,最后根据配置创建JDK的动态代理工厂,或者CGLIB的动态代理工厂,然后返回proxyFactory

1
2
3
4
5
6
7
8
9
10
11
12
13
14
15
16
17
18
19
20
21
22
23
24
25
26
27
28
29
30
31
32
33
34
35
36
37
38
39
40
41
42
/** 
* Create an AOP proxy for the given bean.
* @param beanClass the class of the bean
* @param beanName the name of the bean
* @param specificInterceptors the set of interceptors that is
* specific to this bean (may be empty, but not null)
* @param targetSource the TargetSource for the proxy,
* already pre-configured to access the bean
* @return the AOP proxy for the bean
* @see #buildAdvisors
*/
protected Object createProxy(
Class<?> beanClass, String beanName, Object[] specificInterceptors, TargetSource targetSource) {

ProxyFactory proxyFactory = new ProxyFactory();
// Copy our properties (proxyTargetClass etc) inherited from ProxyConfig.
proxyFactory.copyFrom(this);

if (!shouldProxyTargetClass(beanClass, beanName)) {
// Must allow for introductions; can't just set interfaces to
// the target's interfaces only.
Class<?>[] targetInterfaces = ClassUtils.getAllInterfacesForClass(beanClass, this.proxyClassLoader);
for (Class<?> targetInterface : targetInterfaces) {
proxyFactory.addInterface(targetInterface);
}
}

Advisor[] advisors = buildAdvisors(beanName, specificInterceptors);
for (Advisor advisor : advisors) {
proxyFactory.addAdvisor(advisor);
}

proxyFactory.<strong>setTargetSource</strong>(targetSource);
customizeProxyFactory(proxyFactory);

proxyFactory.setFrozen(this.freezeProxy);
if (advisorsPreFiltered()) {
proxyFactory.setPreFiltered(true);
}

return proxyFactory.getProxy(this.proxyClassLoader);
}

AOP动态代理执行

关于AOP的动态代理执行,有两种主要的方式JDK的动态代理和CGLIB的动态代理,接下来,我们先来看看AOP动态代理的实现选择方式,先上核心实现代码:

1
2
3
4
5
6
7
8
9
10
11
12
13
14
15
16
public AopProxy createAopProxy(AdvisedSupport config) throws AopConfigException {  
if (config.isOptimize() || config.isProxyTargetClass() || hasNoUserSuppliedProxyInterfaces(config)) {
Class targetClass = config.getTargetClass();
if (targetClass == null) {
throw new AopConfigException("TargetSource cannot determine target class: " +
"Either an interface or a target is required for proxy creation.");
}
if (targetClass.isInterface()) {
return new JdkDynamicAopProxy(config);
}
return CglibProxyFactory.createCglibProxy(config);
}
else {
return new JdkDynamicAopProxy(config);
}
}
Spring JDK动态代理实现

在上面的第三步骤说道或根据用户的配置(例如是否配置了 proxyTargetClass属性为true),选择创建的代理类型,这个的代理类型分两种实现,都是比较高效的,下面根据JDK的动态代理来说明AOP的执行,也是先上JdkDynamicAopProxy的核心代码invoke方法:

1
2
3
4
5
6
7
8
9
10
11
12
13
14
15
16
17
18
19
20
21
22
23
24
25
26
27
28
29
30
31
32
33
34
35
36
37
38
39
40
41
42
43
44
45
46
47
48
49
50
51
52
53
54
55
56
57
58
59
60
61
62
63
64
65
66
67
68
69
70
71
72
73
public Object invoke(Object proxy, Method method, Object[] args) throwsThrowable {  
MethodInvocation invocation = null;
Object oldProxy = null;
boolean setProxyContext = false;

TargetSource targetSource = this.advised.targetSource;
Class targetClass = null;
Object target = null;

try {
//eqauls()方法,具目标对象未实现此方法
if (!this.equalsDefined && AopUtils.isEqualsMethod(method)){
return (equals(args[0])? Boolean.TRUE : Boolean.FALSE);
}

//hashCode()方法,具目标对象未实现此方法
if (!this.hashCodeDefined && AopUtils.isHashCodeMethod(method)){
return newInteger(hashCode());
}

//Advised接口或者其父接口中定义的方法,直接反射调用,不应用通知
if (!this.advised.opaque &&method.getDeclaringClass().isInterface()
&&method.getDeclaringClass().isAssignableFrom(Advised.class)) {
// Service invocations onProxyConfig with the proxy config...
return AopUtils.invokeJoinpointUsingReflection(this.advised,method, args);
}

Object retVal = null;

if (this.advised.exposeProxy) {
// Make invocation available ifnecessary.
oldProxy = AopContext.setCurrentProxy(proxy);
setProxyContext = true;
}

//获得目标对象的类
target = targetSource.getTarget();
if (target != null) {
targetClass = target.getClass();
}

//获取可以应用到此方法上的Interceptor列表
List chain = this.advised.getInterceptorsAndDynamicInterceptionAdvice(method,targetClass);

//如果没有可以应用到此方法的通知(Interceptor),此直接反射调用 method.invoke(target, args)
if (chain.isEmpty()) {
retVal = AopUtils.invokeJoinpointUsingReflection(target,method, args);
} else {
//创建MethodInvocation
invocation = newReflectiveMethodInvocation(proxy, target, method, args, targetClass, chain);
retVal = invocation.proceed();
}

// Massage return value if necessary.
if (retVal != null && retVal == target &&method.getReturnType().isInstance(proxy)
&&!RawTargetAccess.class.isAssignableFrom(method.getDeclaringClass())) {
// Special case: it returned"this" and the return type of the method
// is type-compatible. Notethat we can't help if the target sets
// a reference to itself inanother returned object.
retVal = proxy;
}
return retVal;
} finally {
if (target != null && !targetSource.isStatic()) {
// Must have come fromTargetSource.
targetSource.releaseTarget(target);
}
if (setProxyContext) {
// Restore old proxy.
AopContext.setCurrentProxy(oldProxy);
}
}
}

其实上面的注释也说的比较清楚,各个步骤执行的说明:

1)获取拦截器
2)判断拦截器链是否为空,如果是空的话直接调用切点方法
3)如果拦截器不为空的话那么便创建ReflectiveMethodInvocation类,把拦截器方法都封装在里面,也就是执行 getInterceptorsAndDynamicInterceptionAdvice方法

1
2
3
4
5
6
7
8
9
10
public List<Object> getInterceptorsAndDynamicInterceptionAdvice(Method method, Class targetClass) {  
MethodCacheKeycacheKey = new MethodCacheKey(method);
List<Object>cached = this.methodCache.get(cacheKey);
if(cached == null) {
cached= this.advisorChainFactory.getInterceptorsAndDynamicInterceptionAdvice(
this,method, targetClass);
this.methodCache.put(cacheKey,cached);
}
returncached;
}

4)其实实际的获取工作其实是由AdvisorChainFactory. getInterceptorsAndDynamicInterceptionAdvice()这个方法来完成的,获取到的结果会被缓存,下面来分析下这个方法的实现:

1
2
3
4
5
6
7
8
9
10
11
12
13
14
15
16
17
18
19
20
21
22
23
24
25
26
27
28
29
30
31
32
33
34
35
36
37
38
39
40
41
42
43
44
45
46
47
48
49
50
51
52
53
54
55
/** 
* 从提供的配置实例config中获取advisor列表,遍历处理这些advisor.如果是IntroductionAdvisor,
* 则判断此Advisor能否应用到目标类targetClass上.如果是PointcutAdvisor,则判断
* 此Advisor能否应用到目标方法method上.将满足条件的Advisor通过AdvisorAdaptor转化成Interceptor列表返回.
*/
publicList getInterceptorsAndDynamicInterceptionAdvice(Advised config, Methodmethod, Class targetClass) {
// This is somewhat tricky... we have to process introductions first,
// but we need to preserve order in the ultimate list.
List interceptorList = new ArrayList(config.getAdvisors().length);

//查看是否包含IntroductionAdvisor
boolean hasIntroductions = hasMatchingIntroductions(config,targetClass);

//这里实际上注册一系列AdvisorAdapter,用于将Advisor转化成MethodInterceptor
AdvisorAdapterRegistry registry = GlobalAdvisorAdapterRegistry.getInstance();

Advisor[] advisors = config.getAdvisors();
for (int i = 0; i <advisors.length; i++) {
Advisor advisor = advisors[i];
if (advisor instanceof PointcutAdvisor) {
// Add it conditionally.
PointcutAdvisor pointcutAdvisor= (PointcutAdvisor) advisor;
if(config.isPreFiltered() ||pointcutAdvisor.getPointcut().getClassFilter().matches(targetClass)) {
//TODO: 这个地方这两个方法的位置可以互换下
//将Advisor转化成Interceptor
MethodInterceptor[]interceptors = registry.getInterceptors(advisor);

//检查当前advisor的pointcut是否可以匹配当前方法
MethodMatcher mm =pointcutAdvisor.getPointcut().getMethodMatcher();

if (MethodMatchers.matches(mm,method, targetClass, hasIntroductions)) {
if(mm.isRuntime()) {
// Creating a newobject instance in the getInterceptors() method
// isn't a problemas we normally cache created chains.
for (intj = 0; j < interceptors.length; j++) {
interceptorList.add(new InterceptorAndDynamicMethodMatcher(interceptors[j],mm));
}
} else {
interceptorList.addAll(Arrays.asList(interceptors));
}
}
}
} else if (advisor instanceof IntroductionAdvisor){
IntroductionAdvisor ia =(IntroductionAdvisor) advisor;
if(config.isPreFiltered() || ia.getClassFilter().matches(targetClass)) {
Interceptor[] interceptors= registry.getInterceptors(advisor);
interceptorList.addAll(Arrays.asList(interceptors));
}
} else {
Interceptor[] interceptors =registry.getInterceptors(advisor);
interceptorList.addAll(Arrays.asList(interceptors));
}
}
return interceptorList;
}

5)这个方法执行完成后,Advised中配置能够应用到连接点或者目标类的Advisor全部被转化成了MethodInterceptor.
6)接下来货到invoke方法中的proceed方法 ,我们再看下得到的拦截器链是怎么起作用的,也就是proceed方法的执行过程

1
2
3
4
5
6
7
8
9
10
11
12
13
14
15
16
17
18
19
20
21
22
23
24
25
26
27
28
29
30
31
32
33
public Object proceed() throws Throwable {  
// We start with an index of -1and increment early.
if (this.currentInterceptorIndex == this.interceptorsAndDynamicMethodMatchers.size()- 1) {
//如果Interceptor执行完了,则执行joinPoint
return invokeJoinpoint();
}

Object interceptorOrInterceptionAdvice =
this.interceptorsAndDynamicMethodMatchers.get(++this.currentInterceptorIndex);

//如果要动态匹配joinPoint
if (interceptorOrInterceptionAdvice instanceof InterceptorAndDynamicMethodMatcher){
// Evaluate dynamic method matcher here: static part will already have
// been evaluated and found to match.
InterceptorAndDynamicMethodMatcher dm =
(InterceptorAndDynamicMethodMatcher)interceptorOrInterceptionAdvice;
//动态匹配:运行时参数是否满足匹配条件
if (dm.methodMatcher.matches(this.method, this.targetClass,this.arguments)) {
//执行当前Intercetpor
returndm.interceptor.invoke(this);
}
else {
//动态匹配失败时,略过当前Intercetpor,调用下一个Interceptor
return proceed();
}
}
else {
// It's an interceptor, so we just invoke it: The pointcutwill have
// been evaluated statically before this object was constructed.
//执行当前Intercetpor
return ((MethodInterceptor) interceptorOrInterceptionAdvice).invoke(this);
}
}

7)好了拦截器到这边就可以执行了,复杂的代理终于可以起到他的作用了

Spring CGLIB动态代理实现

由于CGLIB的动态代理代码量比较长,在这就不贴出来代码了,其实这两个代理的实现方式都差不多,都是创建方法调用链,不同的是jdk的动态代理创建的是
ReflectiveMethodInvocation调用链,而cglib创建的是Cglib MethodInvocation。

参考

Spring AOP实现原理简介

评论